Dec 28, 2010

Easy Gift Idea

This Christmas, I had no idea what to get for my boss and a co-worker.  I didn't want to spend a lot of money but I definitely wanted to make a big impact.  

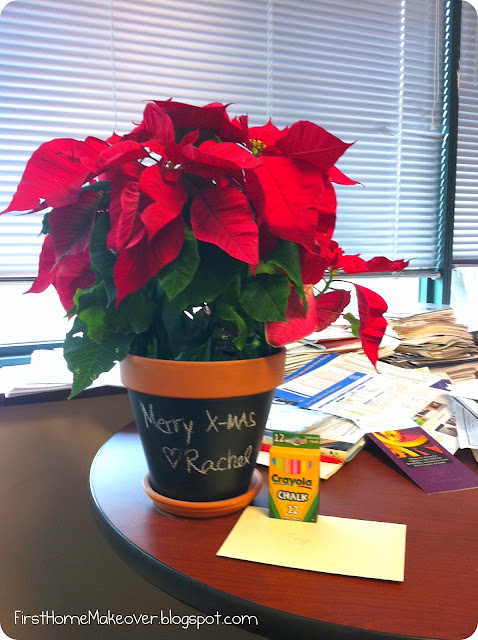
I came up with the idea to paint clay pots with the left over chalkboard paint I had from this project.  And what could be more perfect to put in the clay pots at this time of year than Poinsettias?  

Luckily, the chalkboard paint drys super fast, so I was able to slap two coats of paint on each pot in under a half hour.  I lined the top rim of the pots with painter's tape in order to get a clean line when I painted the top half of the pot.  I found that setting the pot upside down was the easiest way to paint it.

All said and done, these super cute gift ideas cost $10.49.

Materials:
  1. Clay pot and drain - $6
  2. Poinsettia - $3.50 (on sale).  I was lucky enough to find two nice plants among many dried out and dead ones.
  3. Colored Chalk - $.99
  4. Chalkboard Paint - HAD
I set each Poinsettia on the desks of the receivers (as shown above) before they arrived to work.  So this is exactly what they saw when they turned the corners to enter their cubicles. 

On each pot I drew an x-mas tree and snowflake, and wrote, "Merry X-Mas.  Love, Rachel."


My boss has a young daughter who she said was going to love this idea.  She also grows lots of herbs in the summer time -- and this is perfect for just that.   Also, my co-worker is a wonderful gardener so this gift idea will surely come in handy for her.

This is a great gift idea for any time of year!

Dec 19, 2010

Spray Painted Mirror

Hello and happy Sunday my friends!  I hope you're having a good weekend.

I eyed up this mirror over the summer at a thrift store and snagged it immediately.  I thought it was so cool and I knew that a simple coat of spray paint would instantly revive this baby.

Let me explain the red paint on the top part of the mirror -- for a moment, I wanted to decorate our office with red accents.  I saw a picture of a room somewhere that had green walls, very similar my office color (Behr Garden Spot), with red accent pieces and it looked really nice.  I used this mirror to test the red and good thing I did because I decided that red wasn't for me, or our office. 


Cha Ching!!!  Check out the price tag. Yup, $15.  Ahhhhh.
As I took the mirror apart to prepare for spray painting, I noticed it said something on the back.  It reads, ".......... June 3, 1966."  Although it looks like it reads "1866" in the picture, it's actually "1966."  I don't think this warrants a visit to Antique Road Show, but how cool!  This mirror is 44 years old!

After one coat of white RUST-OLEUM Gloss spray paint, my 44 year old mirror now looks like this:
A rather nice touch to our office if I don't say so myself. 
BTW - pay no mind to the ugly yellow chair in the corner of this picture.  Hopefully, one of my x-mas gifts will be to have this reupholstered.  Fingers crossed
:)
I love the glossy white paint. And my favorite part is the dotted border along the frame.

All said and done, this mirror put me $19 in the hole.  I'm certainly not complaining.

So the next time you're about to throw out - what you think is an old and ugly mirror - think twice before chucking it the curb because a can of glossy spray paint can make a world of difference. 

I LOVE SPRAY PAINTING!!!!


This mirror is partying with the best of them at:
The DIY Show OffUndertheTableandDreaming


Dec 16, 2010

Easy Dining Table Decorating

Woo hoooooooooooooooooooo!  

I'm so excited because today I realized that "MY ENTOURAGE" hit the 100 mark.  That makes me so happy and I'm so glad that you've been following my DIY stories and home improvement projects.  I hope that I've inspired some of you and that you've learned a thing or two.  If you have, then great!  Because that means alot to me - and I hope you continue to be inspired and learn from reading my blog.  I started first home makeover blog in Feb. of 2010 and I've had so much fun writing (when I can). THANK YOU for following me on my mission to turn my drab town house into one kick ass home!

Anywho, because Rob and I will be in Florida for Christmas this year, I didn't want to go crazy with decorating.  Also, I'm having a baby shower at my home very soon so I don't need the hassle of packing a bunch of things away to get ready for the party. 

So, the only decorating I did was put a candle light in each window, I hung some front door bling, (my wreath), added some touches to our fireplace and spruced up our dining room table. 

 Here's my easy breezy dining room table decorations: 

The milk glass candle holders were picked up at a thrift store for just a couple buckaroos.

I purchased the glass hurricane (is that what you call it?) and glass candleabras at an estate sale I recently went to.  Scored all the glass decorations for $9.

I just recently started going to estate sales.  They're awesome!  I can't imagine having to sell off a family members household items.  Yikes.  As much as I love going to estate sales I always feel awkward asking how much something is-- a lady once burst into tears when I asked how much a side table was.  Ummmmm, super awkward.   

And I snagged a bundle of the pine garland from Lowe's for $7.99.

My estate sale quests recently began one day out of curiosity. I simply performed a Google search on "estate sales in bucks county" and I uncovered a bunch of local listings.  Lucky for me, my best friend is totally in to finding treasures and cheap stuff too, so it was easy to recruit her along for the ride.  We had so much fun!

If you're up for something new and feel like you haven't scored anything worthwhile from your regular thrifty shopping locations, then maybe you should consider searching for local estate sales in your area.  It may take some time to find something good - just be patient and keep searchin'...you're bound to find something awesome!

Have a wonderful night!

I'm off to have a cup of hot tea and search for bathroom makeover inspiration.  BTW - if you have any cool bathroom inspiration that you love, please share it with me!

Dec 8, 2010

Chalkboard Paint

I spent my Saturday night playing around with Chalkboard paint and creating my front door bling.  Hey, I had fun!  

I've been wanting to use chalkboard paint for awhile but held off because I wasn't sure what wall was best to paint.  There were several factors that led to my final decision, such as the wall's visibility, usage, and size...matters.

This is a small wall which is good because when I'm over the chalkboard paint and want something new, painting over it will be a breeze.  Also, there are always people congregating in the kitchen and we always play board games at the dinette table so this is perfect for taking score and to keep guests busy.  Finally, I hate to scramble for a pen and paper when I want to take note of something - so this wall proved to be perfecto!

Here it was before.  You can see more pictures of our kitchen, here.


And after just two thick coats of this paint, priced around $11.00, and some chalk I picked up for a $1.00...

 
 I created this awesome chalkboard...
  
The possibilities are endless. I'm so happy with how it turned out. I'll use this wall to create a fun sign for my sister's baby shower (being held at my house), and to also welcome my family coming to visit for the holidays, to take score during our next Taboo gathering, to jot down notes and SO MUCH MORE!!!


There's Roxy Gurrrls chillin' against the wall.  She almost always finds a way into my pictures :)


I purchased a pint of the chalkboard paint and after I painted two thick coats there was still about 2/3 left.  I used the left over paint on something else too - but I'll save those pictures for another night. 

Thanks for reading.  Have a good night!


This project is partying with the best of them at:
Join us Saturdays at tatertotsandjello.com for the weekend wrap up party!The DIY Show OffUndertheTableandDreaming The DIY Show Off

Dec 6, 2010

Keepin' Busy

I thought I'd fill you guys in on what I've been up to lately.  I admitted last night that I've slacked on my blogging the past couple of weeks.  But, I've most definitely been busy with all sorts of things...shopping, thrifting, going to estate sales, painting, crafting and more shopping. 

With the holiday season in full swing, I've had to pick my projects carefully, in order not to disrupt the wallet too much.  I've had to put extra dollars aside for presents and less on home decor - major sad face. 

My love for interior design, DIYing and turning this drab little town house into fabulousity has grown so much that I asked Rob to get me a sewing machine and have my office chair reupholstered for x-mas.  Requests for jewelry, clothes and shoes are in the past.  I'm all about decorating and DIYing these days - it makes me so damn gitty and excited. 

Now, I'll share with you some of the things that have caught me eye lately, as well as show some sneak peeks of what's been keeping me go, go, going. 

I spotted this at a thrift store last week.  Isnt' it so pretty.  I love the curves on it and the etching in the legs.  I haven't been able to keep my mind off of it - that usually means I should have swiped it up.  The only reason I didn't buy it was because we have no place for it.  Rob says I should have bought it anyhow since I love it so much.  I'll check back for it tomorrow - I know it's a stretch that it'll still be there but hey, maybe I'll get lucky. 

This canvas map is at IKEA.  It's humungo!  I love it.  I'm totally feelin' maps right now.  I thought this bad boy would look stunning in our office.  I managed to talk myself out of buying this due to the fact that our office is really small and I think this will be too large for the space. 
 
I'm in the market for a sewing machine but I must hold off buying one for now because I need lots of help.  For one, I have no idea what to look for in a sewing machine, what brands are crappy vs. good quality, or even what's best for a beginner.  This machine was $298 at Michael's craft store - a bit pricy for a beginner. 

Do you have advice on what a newby should look for in a sewing machine?  I know nothing.


I started the first steps to reupholster this ottoman.  I've been reading lots of tutorials on how to do this.  This ottoman is several years old and to be honest I'm just so over the fabric.  It's time for a change. 

 I bought four of these chairs for $38.  My original plan was to use them for our dinette table in the kitchen.  Then, I made up my mind to put two in our office.  The yellow looks so good with the green colored walls.  I'm planning to sell the other two.  I'm working on sprucing these lovely ladies up.  Check back soon to see!


 We have a mantel above our fire place and when I spotted these stocking hooks at my favorite thrift store I knew they were perfect for the top.  I've since spruced them up and will share pictures of our simple, fun and just-our-style mantle within a couple days. 


 Now this stuff...I've wanted to paint with this for over a year.  And after months of trying to decide if I should paint our office, bedroom, or kitchen, I've finally made up my mind and painted away!!!  Stay tuned for several Chalkboard paint projects coming your way!

And believe it or not, I still have a couple other things in the works as well.  But I'll save those for another cold, wintery night.  I hope I enticed you, you creative junky you, and I hope you check back soon to see all of these finished projects.   Woo to the hoo!  Until next time.

Have a fantastic night.  Good night.

Dec 5, 2010

Feather Wreath

Hello everyone!  Jeez, I've really been slackin' on my blogging the past couple of weeks.  I hate when I don't write for long periods of time.  I'd love to post a new project everyday but it's kinda tough to work on projects during the work week - I'm sure a lot of you can relate.  And my garage is getting harder to work in now that winter is in full swing and the temperature has been in the 30's.  Brrrrrr. 

But the good news is that even though I wasn't blogging during the past two weeks, I've been keeping quite busy with some fun projects.  Also, I always manage to check in daily with all my favorite websites and blogs to read about what's going on...because we all know good ideas, projects, DIY work and home decorating NEVER sleeps.  Thank goodness for that. 

Tonight I want to share one of several projects I've recently completed, a feather wreath.  I didn't hang a wreath on our front door last year because I couldn't find one I loved.  Also, I was so busy with our bathroom makeover and other odds and ends around the house that finding time to make one wasn't an option.  I decided yesterday morning to make it happen this year after spotting some old faux wreaths at an estate sale. 

Here it is!  Isn't it gorge?  If you want all the details on how I created this beauty, keep on reading...
Welcome to the Steins! 
As you can see above, our cluster of town houses was chosen to have pink doors.  I HATE them.  A neighbor started a petition to have them painted this past summer (heard we got the approval from the board and all) but that's the last I've heard.  If it were up to me I'd have painted our door, and all the neighbors doors for that matter, by now. 

I wanted to work with the pink door and make something that tied in the color, hoping that as a result the door would like a little nicer.

Materials Used:
  • Wreath - $4.19
  • Small Bells - $3.59
  • Small Ornaments Balls - $3.49
  • Ribbon - $.50
  • Glittered Leaves - $3.78
  • Faux Berries - $.98
  • 7 Bags of White Feathers - $11.13
  • Hot Glue Gun (had)
Grand Total:  $27.66
These are the material I chose to use.  As you can see, I went with pinks, golds and purples.

I chose a straw wreath because it was this or a Styrofoam one.  The straw wreath was heavier and I thought this would be better because I didn't want my wreath to fly off the door.

I used a hot glue gun to glue the feathers around the wreath.  I found the best way to glue was to lay the wreath flat.  Because my wreath was going to hang flat on my front door, it wasn't necessary to glue feathers all the way around.  Depending on where you put yours, you may or may not want to do this too. 

First step is to glue the feathers.  I found what worked best was to cover one small area (about 2"x 2") at a time with glue and then press about 3-4 feathers (feather pointing upward) into the glue.  This was repeated until one a full row of feathers covered the wreath. 

Then, I continued gluing the feathers row by row.  Determining how far you should space each row will depend on how fluffy and full you want your wreath to look.  For mine, I put glue at the bottom of the feathers from the previous row (shown below) and then pressed a new row of feathers about an inch below where the previous row ended. 

The image below shows the wreath after about six rows of feathers.  Making progress.  I continued to glue rows of feathers all the way around until there was only about 4 inches of the straw wreath visible. 

Next, I used the remaining 4 inches of straw space to play around with my berries and glittered leaves.  I cut a bunch of pieces off in order to get just the right amount of glittered bling.  Once I knew exactly how I wanted the leaves and berries to lay, I globbed a bunch of hot glue onto the bare straw area and began pressing my decorations firmly into the glue.  

After giving the glue some time to dry I glued feathers around the berries and leaves and then continued on until the straw wreath wasn't visible any longer.
 

I linked a couple bells and ornaments onto a piece of ribbon and tied the ribbon into a tight knot so that they would bunch together in a nice arrangement.   Make sure you cut the ribbon long enough to tie around the wreath.

When I knew where I wanted to place the bell and ornament arrangements on the wreath, I used the remaining ribbon and wrapped it around to the back of the wreath and tied a knot (shown below).  I felt this was the best way to add the arrangements because I can always change them up next year or move them around if I chose - without ruining the feathers.  One quick snip with scissors and the arrangements will come right off. 


Finally, I tied a thicker, shinier ribbon around the top to use for hanging my wreath.  The whole project was completed from start to finish in about an hour and a half. 
Feather wreaths at HomeGoods right now are going for $25-35. 

So pretty
So shiny

So fabulous.  Loving the glitter bling and soft colors


This tutorial is partying with the best of them at
Weekend Bloggy ReadingThe DIY Show Off 
Photobucket

UndertheTableandDreaming PhotobucketThe DIY Show Off