Showing posts with label refinish. Show all posts

Sep 1, 2010

Kitchen Makeover

Yikes!  It's hard to believe that this was our kitchen one year ago.  When we bought our town house this is exactly what it looked like- the horrible border, two layers of caked-on wallpaper (hard to see in pics), 21 year-old blinds, stale cabinets, and oh yeah, the gi-NORMOUS light fixture.  How can you miss that thing?

Our kitchen was the second project we tackled once we moved in.  The first room that we worked on was our living room


The knobs were actually pretty decent so we kept them


Just your standard maple cabinets...


And here's how the kitchen looks today!  This project was a BIG one for us...our biggest yet.  All said and done, I'd say we worked on this extreme makeover for about a month- maybe a little longer.  But hey, well worth it in my book. 


I LOVE, love, LoVe, lOvE how it turned out.  We get so much sunlight in here and the feeling is super airy and open. 

The two corner glass front cabinets and light fixture is new. 


I'm happy with the way the knobs look against the Valspar Swiss Coffee paint. 
 

New Blinds!!!  What a DIFFERENCE blinds make people.


We peeled and ripped wallpaper and argued and sweat and peeled wallpaper and almost gave up and ripped more wallpaper.  The wallpaper just kept appearing. 

We've mastered the art of sanding, smoothing, priming, painting and drying.  

Today, Rob has quite an extensive handyman list of accomplishments- but a year ago, installing a new dishwasher was a pretty impressive task (for a city boy) to do himself, to say the least.  Thank goodness for handy hubbies! Muah.


Aug 25, 2010

For Our Special Guests

I'm so happy to tell you that I just finished a makeover on a dresser and nightstand for my guest bedroom.  After I found the super chic poster bed for this room at a local thrift shop [on my lunch break] I knew I could definitely find the perfect dresser and nightstand too!

About a month ago, Rob was randomly searching around the furniture section on Craigs List when he came across a couldn't-be-more-perfect set for our guest bedroom.  The best part about it was that seller literally lived around the corner from us.  Well actually, the best part about it was that we scored both pieces for one hundo dollars- Cha Ching!!!!

Here's what the pieces looked like when we picked up the furniture

These are the draws I removed from the dresser while I was preparing for the sand down

As you can see above, the wood was badly warped from condensation- but nothing a good sanding job wouldn't take care of.


Our first step was to sand all surfaces with an extra coarse 60 sandpaper .

The course 60 sandpaper worked really well to break through the glossy top coat and in roughing up the wood surface.  Once all surfaces were sanded, we used a very fine 180 sandpaper to smooth out the wood and prepare the surface for painting.


When the sanding was complete, and all surfaces were as smooth as a baby's you know what, we wiped everything really well with a tact cloth.  Tact cloths are great beacause they're really sticky and do a very good job in wiping off all the fine wood particles.

Next step was to paint a primer coat- I chose a latex primer because at the time I wasn't in the mood to deal with the messy clean-up involved with an oil based.  We let the primer dry over night. 

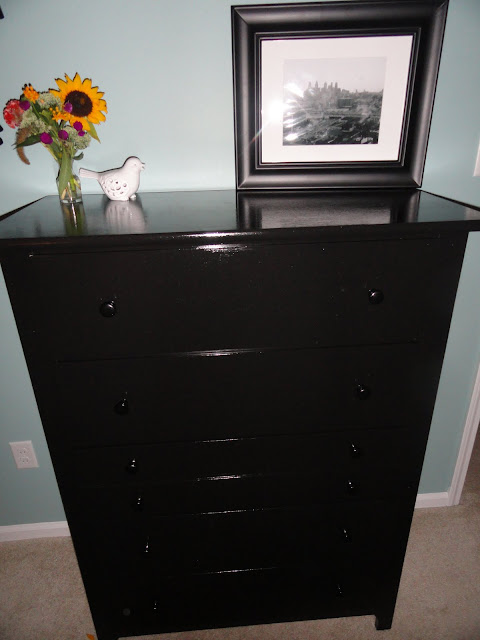
Finally, we painted the pieces with two coats of a black semi-gloss paint.  I chose this type of paint because I thought that the added shine of a semi-gloss would give these peices the extra umph they needed.  Also, I used a semi-gloss on my poster bed and I wanted the finishes to match.

And here's how they turned out


All said and done, this very thrifty dresser and nightstand combo cost us $140.00.